Introduction
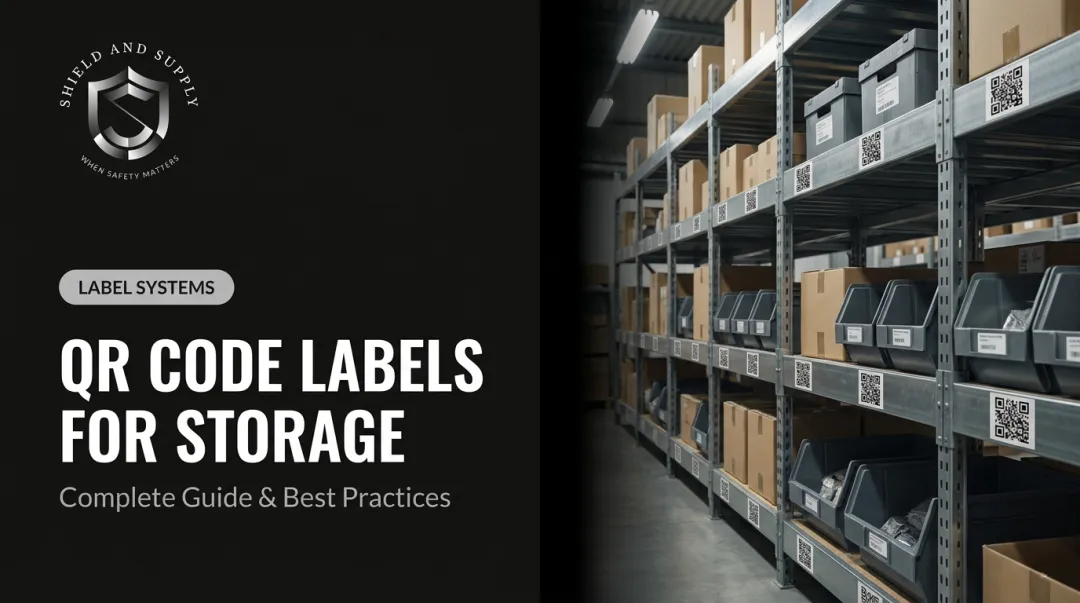
QR barcode labels have become standard infrastructure in industrial environments. Common applications include:
- Warehouse location identification and inventory tracking
- Equipment tags, WIP containers, and maintenance records on manufacturing floors
- Safety data sheet access and compliance documentation in facilities
Research commissioned by GS1 US and conducted by VDC Research found that organizations implementing 2D barcodes can cut operational costs by more than 60%. Facilities still relying on 1D workflows report a 7% first-pass scan failure rate and over $800,000 in annual losses from errors and relabeling.
Printing a QR barcode label sounds simple. Results vary widely depending on printer type, label material, software settings, QR code parameters, and environmental conditions. This guide covers all of them — from equipment selection through batch printing and troubleshooting.
TL;DR
- Thermal transfer printing at 300 DPI is the recommended standard for industrial QR barcode labels
- Four variables drive scan reliability: print resolution, label material, darkness setting, and QR code module size
- Always run a test scan before batch printing — skipping this step is the most expensive mistake in label production
- Industrial environments require polyester or vinyl substrates with industrial-grade adhesive; standard paper labels will fail
- LabelSuite™ handles QR code generation, quiet zone sizing, and batch variable-data printing from one platform
What You Need Before Printing 2D QR Barcode Labels
Preparation determines whether your labels scan reliably on day one and continue to scan a year later. Rushing this phase is the leading cause of wasted media, failed batches, and label programs that get replaced within months.
Equipment and Printer Requirements
QR code labels require a printer with sufficient resolution to render small modules cleanly. 203 DPI can support larger QR codes, but its minimum barcode element size (approximately 5 mil) limits how small your codes can go.
300 DPI supports finer detail down to roughly 3.3 mil, making it the preferred standard for industrial QR label production, particularly for smaller label formats.
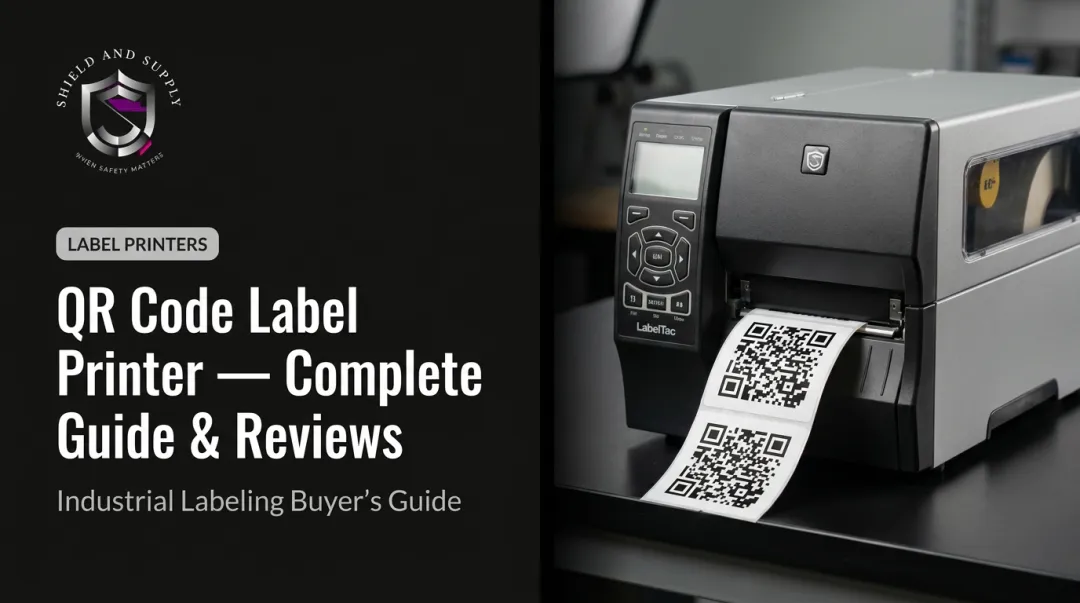
Two LabelTac® printers are built for this work, both printing at 300 DPI via thermal transfer and integrating directly with LabelSuite™ software:
- LabelTac® Pro X ($1,299.99) — prints 1/2" to 4" wide labels, suited for asset tags and inventory formats
- LabelTac® 9 ($3,999.00) — prints 4" to 9" wide labels, built for warehouse and facility-scale applications
Both include a Full Lifetime Warranty.
Label Materials and Supplies
Match your substrate to the operating environment:
| Application | Recommended Material | Why |
|---|---|---|
| Office / light indoor use | Matte paper | Low cost, adequate for ambient conditions |
| Warehouse shelving, equipment tags | Vinyl or matte polyester | Durable, chemical-resistant, long service life |
| Outdoor assets, UV exposure | Glossy polyester (PET) | UV-stable, rated for outdoor use on specified surfaces |
| Chemical exposure environments | Polypropylene or polyester | Solvent resistance with proper ribbon combination |
Thermal transfer labels require a compatible ribbon — resin and wax-resin formulations serve different durability needs. LabelTac® printers use purpose-built ribbons that produce scratch-resistant, chemical-resistant output on vinyl and polyester substrates.
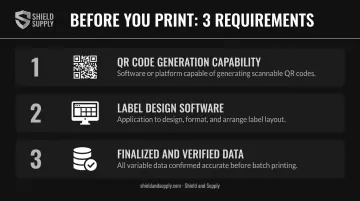
Software and Data Readiness
You need three things before designing a single label:
- QR code generation capability — either a standalone tool or label design software with built-in QR encoding
- Label design software — LabelSuite™ handles QR code creation, label layout, quiet zone sizing, and batch printing with variable data from CSV or Excel files
- Finalized data — URLs, asset IDs, inventory numbers, and SDS links must be tested and confirmed before building your label template
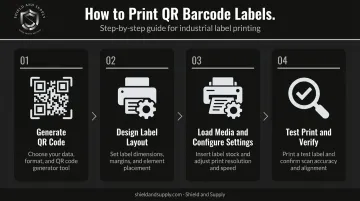
How to Print 2D QR Barcode Labels: Step-by-Step
Step 1: Generate Your QR Code
QR codes range from Version 1 (21×21 modules) to Version 40 (177×177 modules), with each version storing progressively more data. According to DENSO WAVE's QR Code specification documentation, Version 40 can store up to 7,089 numeric characters or 4,296 alphanumeric characters. Higher versions mean more modules, which means a larger physical print footprint at the same module size.
Keep these rules in mind before generating:
- Encode only what you need — a short alphanumeric asset ID produces a lower-version code with larger, more scannable modules
- Use SVG or high-DPI PNG when importing images; low-resolution rasters are a primary cause of unreadable prints
- Verify the generated code scans on multiple devices before building your label template
LabelSuite™ handles QR code generation natively with variable-data encoding, so you can build and verify in one workflow.
Step 2: Design the Label Layout
In your label design software:
- Set exact label dimensions to match your loaded stock
- Position the QR code with a quiet zone of at least 4 module widths on all four sides — this is a mandatory element of QR code standards (ISO/IEC 18004), and its absence causes consistent scan failures
- Add supporting text (asset name, ID, location, hazard classification) clear of the quiet zone
- Confirm the overall QR code size meets your scanner's minimum element resolution requirement
LabelSuite™'s drag-and-drop interface handles these layout elements and supports ISO/IEC 18004-compliant QR code generation out of the box.
Step 3: Load Media and Configure Print Settings
- Load the correct label roll and confirm proper media path alignment
- Install the correct ribbon for your label material (resin for polyester, wax-resin for vinyl)
- In the printer or software settings, configure:
- Print darkness/density — critical for clean module edges; start at the manufacturer's midpoint and adjust in small increments
- Print speed — slower speeds improve quality on fine detail, especially at small module sizes
- Label dimensions — these must match the loaded stock exactly or cuts will misalign
Step 4: Test Print and Verify Before Batch Printing
Print one label. Scan it immediately with a 2D barcode scanner — not just a smartphone. Then inspect it visually:
- Consistent darkness across all modules
- Sharp, clean module edges with no smearing or bleeding
- Correct physical dimensions
- Quiet zone intact on all four sides
Only proceed to batch printing after passing both checks. This single step eliminates most wasted media and failed label runs.
Key Parameters That Affect QR Barcode Label Print Quality
Four parameters determine whether a QR barcode label scans reliably for years or fails within weeks. Getting each one right matters — and they interact.
Print Resolution (DPI)
DPI determines how precisely each QR module is rendered. At lower resolution, small modules blur together or fail to close, creating scan failures that aren't always visible to the naked eye.
Per DENSO WAVE's module size guidance:
- 600 DPI with 4 dots per module = 0.17 mm module size
- 300 DPI with 5 dots per module = 0.42 mm module size
Honeywell advises printing barcodes no smaller than 10 mil unless comprehensive quality testing has been performed. For small labels in industrial environments, 300 DPI provides the margin needed to stay within safe module dimensions.
Label Material and Adhesive
A QR code that scans perfectly in the print room is useless if the label delaminates within a week. The durability hierarchy for common industrial substrates:
- Paper → ambient indoor use, short service life, not suitable for chemicals or heat
- Vinyl/matte polyester → warehouse and equipment use, chemical-resistant with the right ribbon
- Glossy polyester (PET) → highest durability tier, rated for outdoor UV exposure, widest temperature range
Adhesive selection matters as much as substrate. Standard permanent adhesive fails on low-energy plastics, powder-coated metal, and surfaces with residual oils — aggressive permanent adhesive is required for those applications.
Magnetic variants (available in the LabelTac® supply line) are repositionable, which is useful for rack labels that shift with warehouse layout changes.
Print Darkness/Density
This setting controls print head heat application, and errors in either direction cause scan failures:
- Too low → faint, underprinted modules that scanners can't read
- Too high → ink bleed that closes the white space between modules, destroying contrast
The correct setting varies by label material and ribbon combination. Calibrate darkness with each new media load; don't assume the previous setting carries over.
QR Code Module Size
Larger modules are more stable, scan at greater distances, and work with a wider range of scanner hardware. The minimum physical size is a calculation, not a fixed universal number: (number of modules + 8 quiet-zone modules) × X-dimension. Per GS1's sizing formula, a 29-module-wide QR code at a 0.396 mm X-dimension produces a label approximately 14.65 mm wide.
For industrial scan environments where operators are using handheld or fixed-mount scanners, size up rather than down. Reserve minimum-size codes for controlled environments with high-resolution scanners.

Common Mistakes and Troubleshooting
Most failed QR label programs trace back to a short list of predictable errors.
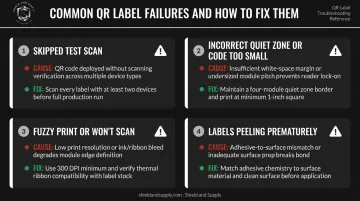
Skipping the Test Scan
Printing a full batch without verifying scannability first is the most expensive mistake in label production. One test print and one scan takes under a minute. Reprinting hundreds of labels after a settings error takes far longer — and wastes material.
Incorrect Quiet Zone or QR Code Too Small
This usually means the label template was built without adequate quiet zone, or the QR code was scaled down to fit a smaller label without reducing the data payload.
Verify a minimum 4-module quiet zone on all sides. If the code must fit a smaller label, reduce the data payload — use a shorter URL or alphanumeric ID to lower the version number and increase module size at the same print dimensions.
QR Code Prints Fuzzy or Won't Scan
Low print resolution is almost always the culprit — either the printer DPI is insufficient for the label size, or the source QR image was rasterized at low DPI before import.
To fix it:
- Regenerate the QR code as an SVG or high-DPI image (300 DPI minimum)
- Increase printer DPI if the hardware supports it
- For thermal transfer printers, inspect for ribbon wrinkle or a worn print head
Labels Peeling or Failing Prematurely
Wrong adhesive for the surface is the consistent cause. Standard permanent adhesive fails on low-energy plastics, powder-coated steel, and surfaces regularly cleaned with solvents.
Identify the surface energy and texture first, then select the appropriate adhesive class:
- Standard permanent — smooth, high-energy surfaces in stable environments
- Aggressive permanent — low-energy plastics, powder-coated metals, textured surfaces
- Removable — temporary applications or surfaces requiring label rotation
Confirm adhesive compatibility with the facility's cleaning protocol before applying the full batch.
Alternatives to In-House QR Barcode Label Printing
In-house printing isn't always the right fit. Here's when each alternative makes sense:
Pre-Printed Labels from a Commercial Supplier
Best for large volumes of identical QR codes, specialty materials your in-house printer can't handle, or print quality requirements that exceed desktop or industrial printer capability.
The trade-offs are real, though: longer lead times, minimum order quantities, and no on-demand flexibility. Per-unit cost drops at high volumes but rises sharply for small runs.
QR Code Label Sheets on a Standard Office Printer
Works for very small-scale or one-off needs — office asset tagging, demos, or non-industrial environments where durability isn't a concern.
For anything industrial, this approach falls short. Inkjet and laser printers on standard paper lack the durability, UV resistance, and adhesive performance that facility environments require.
Outsourced Printing with In-House Software Management
A practical middle ground for facilities that need durable QR labels at scale but prefer to manage data encoding and label design in-house while contracting physical print production to a specialist.
Key considerations before going this route:
- Requires clean handoff files and capable label design software
- Adds a procurement step, but removes the capital investment in industrial printer hardware
- LabelSuite™ handles the design and data management side of this workflow, including CSV/Excel import for variable data
The right choice depends on your volume, turnaround requirements, and how much control you need over label content after the initial print run.
Conclusion
Reliable QR barcode label production comes down to matching the right equipment, media, software, and print settings to the specific application — and verifying each element rather than assuming. The step-by-step process is straightforward, but every shortcut creates a predictable failure point.
What drives consistent results is process discipline: test before batch printing, choose media rated for your actual environment, and recalibrate settings with every new supply load. Maintain those habits, and your QR labels will scan reliably from first application through the end of their service life.
Frequently Asked Questions
What is the minimum size a QR code label should be to scan reliably?
There's no universal minimum — physical size depends on the QR version (number of modules), your chosen X-dimension (module size), and your scanner's resolution. A higher-data-payload code requires more modules, which demands a larger print area to keep each module scannable. Industrial environments typically require larger minimum sizes than consumer smartphone scanning.
What DPI do I need to print readable 2D QR barcode labels?
203 DPI works for larger QR codes but limits how small your modules can be (approximately 5 mil minimum). 300 DPI supports finer module sizes (approximately 3.3 mil) and is the standard for industrial QR label production. Both LabelTac® Pro X and LabelTac® 9 print at 300 DPI.
What type of label material is best for industrial QR barcode labels?
Polyester (PET) is the top choice for demanding environments — it handles wide temperature ranges, UV exposure, and chemical contact. Vinyl and polypropylene cover most standard warehouse and equipment applications. Also match your adhesive to the surface; powder-coated metal and low-energy plastics require aggressive permanent adhesive.
Can I print QR barcode labels without special software?
Basic QR code generation is possible with free online tools, but dedicated label design software is strongly recommended. Without it, managing quiet zone margins, correct sizing, and batch printing across hundreds of unique labels becomes error-prone and time-consuming. LabelSuite™ handles all three from a single platform.
Can I print QR barcode labels in bulk from a single template?
Yes. LabelSuite™ supports batch/variable-data printing by pulling asset IDs, serial numbers, or location codes from CSV or Excel files and auto-populating individual labels. This is the standard workflow for warehouse location labeling, asset tagging programs, and serialized inventory labels.
How do I make sure my printed QR codes stay scannable over time?
Long-term scannability comes down to three things:
- Substrate: Use polyester or vinyl matched to your environment
- Print method: Thermal transfer resists heat, UV, and chemicals far better than direct thermal
- Placement: Shield labels from direct abrasion, especially on rack edges and equipment handles