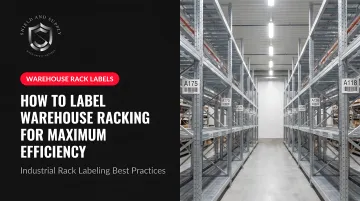
This guide covers the exact steps to label warehouse racking from scratch, the variables that determine whether your system holds up under daily operational pressure, and the mistakes that cause labeling projects to fail within months of completion.
Key Takeaways
- Map your warehouse into zones, aisles, bays, levels, and positions before touching a single label
- Follow a hierarchical address format — Zone, Aisle, Bay, Level, Position — using alternating letters and numbers
- Match label material to environment — standard vinyl for ambient areas, cold-storage-rated adhesives for freezers
- Scan every applied label into your WMS to catch mapping errors before they cause operational problems
- Run annual audits to catch faded labels, layout changes, and shifting inventory categories before they cause problems
How to Label Warehouse Racking: Step-by-Step
Step 1: Map Your Warehouse Layout First
Walk every zone, aisle, bay, shelf level, and bin position before designing a single label. Document areas with special conditions — cold storage, chemical exposure, high-traffic forklift aisles — because these zones need different materials.
Before printing anything, confirm your physical layout aligns with how your WMS organizes locations. If your inventory software uses a different naming convention than your planned labels, fix that mismatch now — not after 2,000 labels are on the rack.
Step 2: Design Your Location Address System
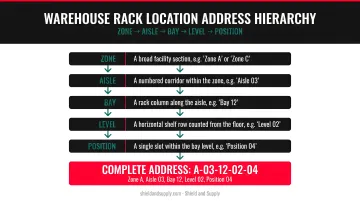
Build a hierarchical address format moving from largest to smallest unit:
Zone → Aisle → Bay → Level → Position
A format like A-03-02-B-04 reads as: Zone A, Aisle 03, Bay 02, Level B, Position 04. Alternating letters and numbers — rather than all-numeric codes — reduces transposition errors and makes addresses intuitive for new staff.
Two design rules that matter most:
- Sequential and directional — address codes should make logical sense as workers move through aisles
- Scalable — leave room to add aisles or bays without forcing a full re-label
Step 3: Choose the Right Label Material for Each Zone
| Zone Type | Recommended Material |
|---|---|
| Clean, dry ambient areas | Standard vinyl or coated paper |
| Cold storage / freezers | Polyester with cold-temperature acrylic adhesive |
| High-humidity or chemical exposure | Polypropylene or polyester |
| Frequently reconfigured areas | Magnetic label stock |
According to Avery Dennison's adhesive specifications, standard adhesives are formulated for application at +5°C, while deep-freeze adhesives maintain bond strength down to -20°C. Spec the wrong adhesive and labels start peeling within weeks.
Label size matters too. High pallet rack labels viewed from forklift height need larger fonts and overall dimensions than bin-level pick labels read at arm's reach. A practical rule of thumb: minimum letter height should be roughly 1 unit per 200-300 units of viewing distance.
Step 4: Print Labels with Consistent Quality
Use an industrial-grade label printer capable of producing crisp, scannable barcodes. For barcode verification, GS1 references ISO/IEC 15416 for linear symbols and ISO/IEC 15415 for 2D symbols — these are the standards your output should meet, not just a DPI target.
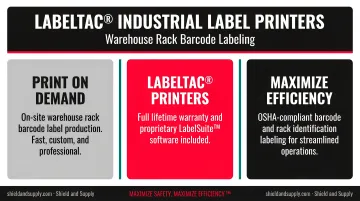
Shield and Supply's LabelTac® Pro X handles label stock from ½" to 4" wide, while the LabelTac® 9 covers 4" to 9" widths at up to 2,500 labels per day — suited to large-format rack signs visible from forklift height. Both printers include LabelSuite™ software built for industrial labeling workflows, including rack location labels.
Before a full production run:
- Print a test batch
- Verify barcode scannability with your actual handheld scanner
- Confirm font and contrast are readable at the intended viewing distance
- Check that address codes match your WMS location list exactly
Step 5: Apply Labels in Standardized Positions
Pick one placement standard and apply it across every rack in the facility. The most common approach: beam face, at eye level, on the left upright of each bay.
Placement consistency matters more than most teams realize. When labels appear at different heights or on alternating sides, workers spend extra time locating the label before they can even read it — those lost seconds compound across thousands of picks per day.
Additional placement best practices:
- Use directional arrows to indicate which shelf level is above or below each label
- Clean rack surfaces before applying adhesive labels — dust and oils cause premature peeling
- In high-forklift-traffic aisles, use label protectors or recessed holders to prevent impact damage
Step 6: Integrate with Your WMS and Train Staff
Scan every applied label into your WMS immediately after application. This step catches placement errors — a label applied to the wrong bay, a code transposed during printing — before they cause inventory discrepancies.
Then run a structured staff walkthrough covering:
- How to read the alphanumeric address codes
- How to interpret directional arrows on multi-level racks
- The procedure for reporting damaged or missing labels
What You Need Before Labeling Your Racks
Rushing into printing without completing these prerequisites is the most common reason labeling projects fail within the first year. Work through this checklist before you print a single label.
Equipment and Tools Required
- Industrial-grade label printer (sized to your label width requirements)
- Barcode scanner for post-application verification
- Label design software with rack label support
- Appropriate label stock selected for your specific zones
Shield and Supply's LabelTac® lineup covers both standard rack label sizes (Pro X, ½"–4") and large-format aisle/level signage (LabelTac® 9, 4"–9"). The included LabelSuite™ software handles label design for rack labeling applications at no additional cost.
Inputs and Information Needed
- Finalized warehouse floor map with all zones, aisles, bays, levels, and positions
- Complete SKU or inventory list to determine how many unique locations you need
- Address format approved by warehouse management and confirmed against your WMS configuration
Safety and Compliance Readiness
Before finalizing your label set, confirm that load capacity plaques are included — not just location address labels. ANSI/RMI MH16.1, Section 4.5 specifies what each plaque must display. Plaques must be at least 50 square inches and posted conspicuously on each rack configuration.
Each compliant plaque must show:
- Maximum load per shelf level
- Maximum load per bay
- Number of storage elevations
OSHA 1910.176 covers general material storage safety. Location address labels are separate from these required safety placards — your labeling plan needs both.
Key Factors That Determine How Well Your System Works
Two warehouses can follow the same implementation steps and land at very different performance levels. These four variables account for most of that gap.
Numbering Convention and Address Logic
An illogical address scheme forces workers to memorize exceptions. A well-designed sequential system means any picker — including staff hired last week — can navigate to any location with minimal orientation.
Top-performing distribution centers benchmark order-picking accuracy at 99.68% or higher, according to a 2025 distribution center metrics white paper. Address system clarity is one of the core prerequisites for reaching that level — not the only one, but a requirement.
Label Visibility and Placement Consistency
Labels placed inconsistently — some on left uprights, some on right; some at eye level, some near the floor — force workers to find the label before reading it. That extra search time is invisible on any single pick but compounds into significant time loss across a full day of operations.
High-contrast color schemes (black on white, or white on a dark background) and directional arrows on multi-tier labels eliminate the most common sources of picker hesitation.
Label Material and Durability
Zebra's material classification guide draws a clear line between paper and synthetics: paper suits short-to-medium indoor use with minimal chemical resistance, while polyester labels withstand outdoor conditions for up to three years and temperatures up to 302°F. For any rack in a non-ambient zone, synthetic material isn't optional.
Shield and Supply's LabelTac® vinyl supply rolls are rated for 5–10 years indoors or outdoors. For cold storage applications, call 1-877-514-0727 to confirm the right material and adhesive combination for your specific temperature range.
Barcode Format and Scanner Compatibility
Not all barcode formats suit all scanning hardware or WMS configurations. Key format considerations:
- Code 128 — standard 1D format, widely supported, encodes all 128 ASCII characters
- GS1-128 — Code 128 subset using GS1 Application Identifiers; use when your WMS expects GS1 syntax
- Data Matrix (2D) — encodes up to 2,335 alphanumeric characters with error correction; tolerates more scan-angle variation, useful on forklift-accessed racks
- QR Code (2D) — high data capacity, but requires image-based scanning hardware; confirm WMS readiness before selecting
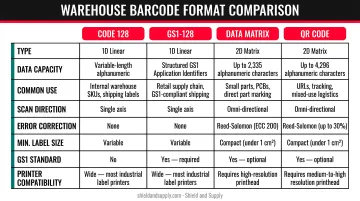
Confirm your barcode format choice with your WMS vendor before printing. A format mismatch means pickers fall back to manual data entry, which introduces the keying errors and slowdowns your labeling system was built to eliminate.
Common Mistakes When Labeling Warehouse Racks
Most labeling failures come down to four recurring problems:
- Mixing numbering formats across aisles — sequential codes in one zone, descriptive text in another (e.g., "FREEZER-SHELF-A" alongside "03-02-B") — creates confusion that compounds over time and forces costly re-labeling. Define one format before printing a single label.
- Using the wrong label material for the environment. Standard adhesives lose bond strength below +5°C, making them unreliable in cold storage or high-humidity docks. Use cold-temperature-rated adhesives wherever freezer conditions apply.
- Placing labels where scanners can't reach them — behind rack guard posts, above forklift height, or on back uprights. If a scanner can't read the label from normal operating position, the placement is wrong, regardless of label quality.
- Skipping WMS verification after applying labels. Each label needs to be scanned into your WMS immediately after placement. Skip this step and you create phantom locations — items logged in positions that don't exist on the physical rack. This gets rushed most often during warehouse go-lives, where it matters most.
When to Re-Label or Audit Your Rack Labeling System
Labeling isn't a one-time project. Treat the initial implementation as version 1.0, not a permanent installation.
Audit triggers — schedule an immediate review when you see:
- A measurable uptick in picking errors or inventory discrepancies
- Warehouse layout reconfiguration or rack relocation
- New product categories with different storage requirements
- Any rack damage, repair, or replacement
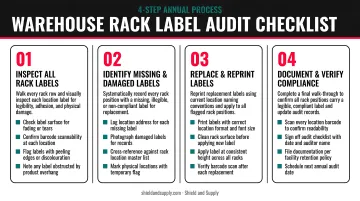
Annual audit process:
- Walk every aisle and visually inspect for faded, peeled, missing, or misaligned labels
- Scan a random sample of barcodes to verify WMS mapping accuracy
- Replace any label that fails a visual check or produces a scan error
- Document any placement corrections to update your placement standard
Warehouses using industrial-grade vinyl or polyester label stock replace labels far less often than those using paper stock. The upfront cost difference is small — the operational cost of an ongoing re-labeling cycle is not.
Frequently Asked Questions
Frequently Asked Questions
What is the OSHA standard for warehouse racking?
OSHA 1910.176 covers general material storage safety, requiring stored materials to be stable and secured against collapse. Load capacity plaques are governed by ANSI/RMI MH16.1, which mandates plaque content (max load per shelf, per bay, and number of storage elevations), a minimum size of 50 square inches, and conspicuous posting on each rack configuration.
What are the 4 types of labels used in warehouse racking?
The four primary types are: location/address labels (identify aisle-bay-level-position for every slot), barcode labels (enable scanner-based WMS tracking), safety/load capacity labels (ANSI/RMI-required structural specs posted on each rack), and specialized labels such as magnetic or color-coded zone labels for flexible or category-specific areas.
What are racks in a warehouse called?
The most common type is pallet racks (also called selective racks), designed for standard palletized loads. Other types include drive-in racks, push-back racks, cantilever racks for long or irregular items, and smaller shelving units for bins and individual pick items.
How do I create an effective location address system for warehouse racks?
Assign addresses hierarchically from largest to smallest unit: Zone → Aisle → Bay → Level → Position. Use alternating numbers and letters to reduce read errors (e.g., A-03-02-B-04). Keep the system sequential and directional, and mirror the exact same address codes in your WMS — any mismatch between physical labels and digital records creates inventory errors.
What label material is best for cold storage warehouse racks?
Polyester or polypropylene labels with cold-temperature-rated acrylic adhesives. Standard adhesives are formulated for application at +5°C and will lose bond strength in freezer environments. Deep-freeze-rated adhesives maintain performance down to -20°C. Contact Shield and Supply at 1-877-514-0727 to confirm the right material spec for your facility's specific temperature range.
What are the latest trends in warehouse rack labeling?
RFID-enabled labels are accelerating adoption: GS1 US confirms they eliminate line-of-sight scanning, letting fixed readers on forklifts or dock doors capture location data automatically. 2D barcodes (Data Matrix, QR) are also replacing 1D codes for higher data capacity and better scan-angle tolerance. MHI's 2024 industry report projects 83% five-year adoption of automatic identification technologies across supply chain operations.